Updates
2025-09-23:
- UV printing on advanced materials interest check and beta testing application: Click here to complete the survey
2025-06-30:
- White toner printing is now obsolete. This process will be replaced with CMYKW UV printing, which provides a higher quality result.
Ordering Process
- DM me on Discord (@tapucosmo) or Instagram (@tapucosmo) with your order quantity (in units of sheets) and deadline. Specify the options you want.
- Send me your design on Discord (@tapucosmo) or email (------------@----------------.-----). You may also send it on Instagram, but as a link to an external image host instead of in a message (to avoid lossy compression). Use png or svg format only. (See the Design section for more information on preferred design attributes.) Send me a message and wait for me to confirm to ensure your order doesn’t get lost.
- I will send you a preview showing the designs and cut paths. Verify that it is good, or suggest changes. (Note: this print preview does not have soft proofing applied.)
- Once I am finished, I will ask you for a place and time on campus that we can meet for pickup.
- Pay me after delivery. I accept Venmo, PayPal, Zelle, or cash. (You may negotiate other forms of payment, but I reserve the right to decline.)
NOTE: To maximize the number of orders I can fulfill, I prioritize orders by planned drop date, not by first come first serve.
I reserve the right to refuse service to anyone for any non-discriminatory reason, including, but not limited to, breaking Petr community guidelines. Requested deadlines are not guaranteed.
Prices
Each sheet has 7.5x10 inches of usable area. Prices are per sheet, so you can do many small stickers or a single full size sticker for the same price. Each sheet fits 25 standard size (1.5x2 inch nominal) Petr stickers.
Prices for customers who had placed at least one order before September 2025
Base Prices:
The prices are the same for all laminates. The base prices below are for the different substrates (“papers”) available.
- Regular (white vinyl): $4/sheet
- Glow in the dark vinyl: $6/sheet
Holo and gold substrates are temporarily unavailable due to equipment upgrades. The substrates below are printed using a CMYKW UV printer instead of a regular inkjet printer. Please see the section below on CMYKW Design Considerations for more info on the special design considerations required.
Holo vinyl: $5/sheetGold vinyl: $5/sheet
Photo and Poster Printing:
- 4x6 inch satin photo paper: $1/each
- Minimum Order Quantity: 5
- 5x7 inch satin photo paper: $1.25/each
- Minimum Order Quantity: 5
- 11x17 inch satin photo paper: $6/each
- 13x19 inch satin photo paper: $8/each
Prices for all other customers
Base Prices:
The prices are the same for all laminates. The base prices below are for the different substrates (“papers”) available.
- Regular (white vinyl): $5/sheet
- Glow in the dark vinyl: $7/sheet
Holo and gold substrates are temporarily unavailable due to equipment upgrades. The substrates below are printed using a CMYKW UV printer instead of a regular inkjet printer. Please see the section below on CMYKW Design Considerations for more info on the special design considerations required.
Holo vinyl: $6/sheetGold vinyl: $6/sheet
Photo and Poster Printing:
- 4x6 inch satin photo paper: $1/each
- Minimum Order Quantity: 5
- 5x7 inch satin photo paper: $1.25/each
- Minimum Order Quantity: 5
- 11x17 inch satin photo paper: $6/each
- 13x19 inch satin photo paper: $8/each
For logistical reasons, all photo and poster printing will be batched, so there may be a 1-2 week delay. Please order well in advance of when you need them. There may be some ink trails on the back of the photo paper when printing borderless.
Other Services:
- Dye sublimation printed tote bags: $7 each, MOQ 4
- Dye sublimation printed mugs: $7 each, MOQ 4
Custom Requests: Send me a message with your request to determine feasibility and obtain a quote.
Price Stability
If you had previously ordered from me before June 30, 2025, your prices will not increase for the foreseeable future. I reserve the right to cancel this promotion at any time for any reason without notice.
You are responsible for ensuring that you are able to have your requested designs printed.
Sales taxes are included in all prices.
I probably won’t be raising my prices unless material costs skyrocket for some reason. Hopefully I don’t get flooded with orders from this.
Available Special Laminates


Design
Please send me your design as a png or svg with a transparent or white background. Designs should ideally have at least 720 pixels per inch. Specify the dimensions you want for each sticker. All designs for each sheet must have the same bounding rectangle dimensions; otherwise, smaller designs will be scaled up to the maximum size that fits the bounding rectangle of the largest design.
Cut Options
Unless otherwise specified, the borders around designs will be set to around 1.5-2 mm. Cut tolerances are +/- 1 mm.
- Die Cut: Cuts all the way through, around the design.
- Kiss Cut: Cuts through the sticker layer only around the design, leaving the paper backing intact. Stickers are separated into rectangles.
- Custom: More complex designs may make use of both die and kiss cuts. If you leave a white border on your design with a transparent background, it will be used as the cut path.
You may also choose to specify your own cut paths. If you choose to do so, include your design in an Inkscape svg as an embedded rasterized image (png), with path layers specifying the cut paths. Name cut paths starting with SSG_KISS_CUT for kiss cut paths and SSG_THROUGH_CUT for die cut paths. Send me the resulting svg.
Custom Options
Variable Text
It is possible to include different text on each sticker. For example, this can be used to place sequential numbers onto stickers. If you choose to do so, include your design in an svg as an embedded rasterized image (png), and place text in the svg where you want. Make sure that the font size and other attributes of the text are as you want it. Include $stickerID in the text (this is the variable that will change). Send me the resulting svg, and specify what you want the variable to be replaced with. You can specify a range, or provide a list of individual values. I may request that you send me the fonts you used if you had used non-standard fonts.
You may alternatively have me place the text for you, but you will have less control over the precise placement and size of the text.
If the range or list of values is smaller in length than the number of stickers to be printed, $stickerID will be set to be blank for the remaining stickers.
Note that this process was designed for using Inkscape to create the svg. Using other software may result in minor differences.
Example: The following design has a variable text range of 1 / 15 to 15 / 15 (only the first 6 are shown).

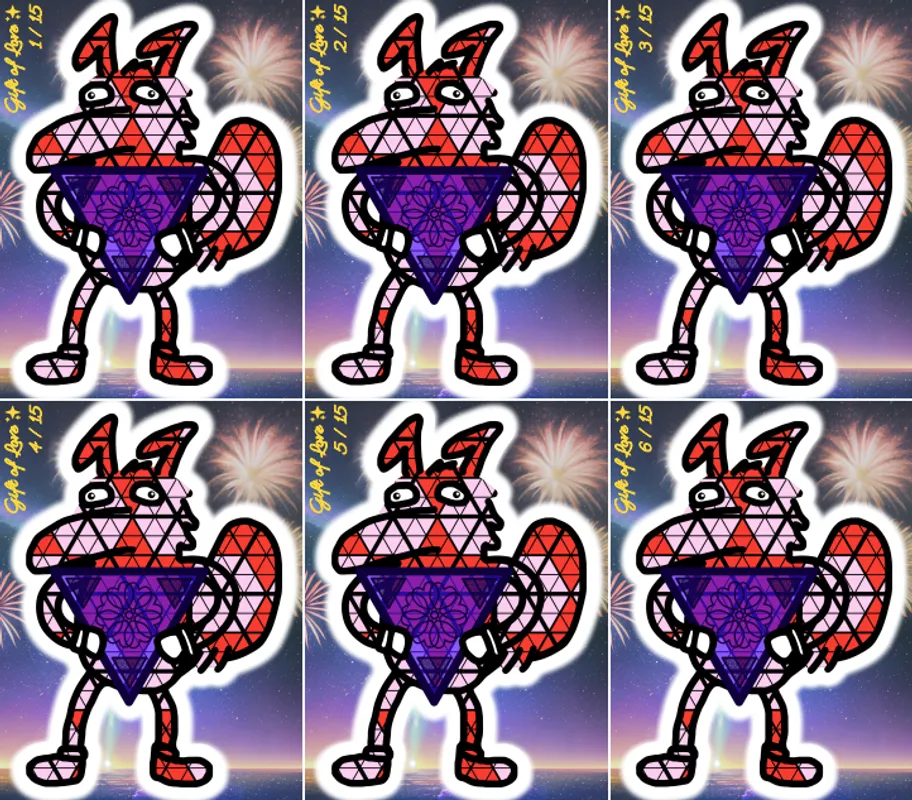
Design Credit: @petr_the_puzzlr
Backgrounds
This only applies to kiss cut designs. You can provide an image that will be used as the background (see above example). It is highly recommended that you specify your own cut paths and include the background in the svg so that you have precise control over the dimensions and placement of the background. Make sure to include some bleed in the border of your design to account for the tolerance of the kiss cut.
Note that there will be a small (~0.5 mm) white border around the background to account for cutting tolerances. If you do not want this border, please state that in your order, and a small amount of the border will be cut off instead (resulting in a slightly smaller actual size).
Borders
Instead of the standard white border, you can provide a solid color, gradient, or image to be used as the border around the design. Make sure the border is ~1 mm larger than the cut path to account for cut tolerances. Send the design in 2 files, with and without the border, at the same resolution.
Back Side Printing
You may send me a design to print on the back side (paper backing) of the sticker. If you use Variable Text, then you can specify a different set of values to be used for $stickerID on the back side.
Other Requests
If you have any other requests, feel free to ask and I’ll see what I can do. Prices may be increased for any labor intensive requests.
CMYKW Design Considerations
When designing for CMYKW prints onto holo or gold paper, the alpha channel becomes important. For example, drawing black at 50% opacity is no longer equivalent to drawing gray at 100% opacity. This also means that designs are required to have transparent backgrounds; white backgrounds will result in white being printed.
You may not be used to explicitly needing to draw white in white regions of your design. It is suggested that you temporarily have a colored layer as a background while drawing white regions to ensure that you do not miss any areas, which would result in those missed areas being silvery holo instead of white.
You may borrow a set of color reference charts to assist you in selecting colors and alpha values for partial holo areas in your design. Please note that you will be charged $20 if you damage or lose my reference charts. The current reference charts are outdated, and new ones will be available in the future.
Color Managed Workflow
My printer has been color calibrated and profiled. It is possible to preview nearly the exact colors that will be physically printed by downloading the ICC profile for my printer and using it for soft proofing. Download ICC Profile Here This will also allow you to determine whether any of the colors in your design are unprintable due to being outside of the printer’s color gamut. (Note that you should ignore pure black being out of gamut, since it will always be impossible to print pure black.)
I will print with Relative Colorimetric rendering intent by default. Explanation of color rendering intents
For best results, your monitor will need to be color calibrated as well. I have a monitor calibration device (Colormunki Display) available for you to borrow if needed. It is confirmed to work with DisplayCAL. You will need to do the software setup and configuration yourself. I will not provide technical support for this process. If you lose or damage my Colormunki Display, you will be charged $100.
The ICC profile of my printer can be used in art or design software that supports soft proofing. The following is an example configuration in GIMP:
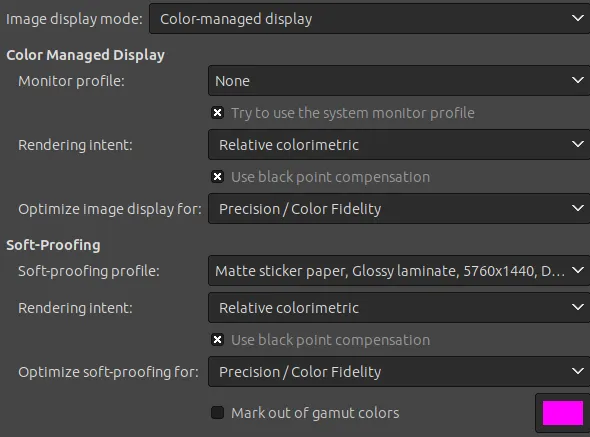
Note that the monitor profile is set to None as I already have my monitor’s profile applied system-wide and GIMP is able to detect it. For soft-proofing, use the ICC profile I provided and set the rendering intent to Relative Colorimetric. You should also configure a keyboard shortcut to quickly enable/disable soft proofing and another shortcut for marking out of gamut colors.
Here is a different example for Inkscape:

For unknown reasons, the Retrieve profile from display option did not work for me, so I manually specified the ICC profile for my display. You can toggle soft proofing using the
Materials Information and Specifications
- Ink:
- Channels: 8 (CMYKLcLmLkLLk)
- Type: pigment
- Minimum resolvable detail: ~0.05-0.1 mm
- Cut tolerances: ~1 mm
- Fade resistance: little noticeable fading after 2 months outdoors
- Sticker material: vinyl with paper backing
- Regular laminated sticker thickness: ~0.36 mm (with backing), ~0.22 mm (without backing)
- Holo laminated sticker thickness: ~0.32 mm (with backing), ~0.18 mm (without backing)
- Color profile illuminant: D50 CIE daylight 5000K